Are you looking to replace your refrigerator’s compressor or evaporator coil? If so, then you’ll likely need to remove the existing refrigerant from your fridge. Don’t worry – it’s a simple process that doesn’t require any special tools. In this blog post, we’ll show you how to safely remove the refrigerant from your refrigerator.
Prepare for Refrigerant Removal
Before beginning the process of removing refrigerant from a refrigerator, it is important that you first check the disposal regulations in your area. It is illegal in most states to release refrigerant into the atmosphere and you may be subject to fines and other penalties if you fail to comply with the regulations. Additionally, unless you are a Section 608 certified technician, you should not attempt to remove Freon from a refrigerator or other appliance yourself.
Check for Leaks
Before proceeding to remove the refrigerant from the refrigerator, it is important to check for any potential leaks. If a leak is present, it must be repaired before any further steps can be taken. This will help to ensure that all of the refrigerant is removed safely and efficiently. A qualified technician should be consulted for repairs and assistance with leak detection.
Disconnect the Refrigerator from the Power Supply
Once the refrigerator has been disconnected from the water supply and the doors and shelves have been removed, it’s time to disconnect the refrigerator from the power supply. This requires unplugging the power cord from the wall outlet and turning off any circuit breakers connected to it. Once this is done, you can then proceed with locating the refrigerant lines in order to cap them off before attaching a refrigerant recovery machine.
Disconnect Refrigerator from Water Supply
The next step is to disconnect the refrigerator from its water supply. Make sure to turn off the water valve and disconnect the water line. It’s important to be careful when handling the water line, as it can be difficult to reattach. Once the water line is disconnected, you can move forward with removing the refrigerant.
Remove Refrigerator Doors and Shelves
Removing the refrigerator doors and shelves is the next step in removing the refrigerant. Carefully remove the doors and shelves and set them aside. Take care not to damage any of the parts when removing them. Once the doors and shelves are removed, you will be able to see the refrigerant lines.
Locate the Refrigerant Lines

Once you have disconnected the refrigerator from the power and water supply, you will need to open the refrigerator door and remove any shelves or interior components. This will give you access to the refrigerant lines. The lines will be clearly marked and should be easy to locate. Make sure that you are wearing protective gloves and eye protection when handling the refrigerant lines.
Cap the Refrigerant Lines
Once you have located the refrigerant lines, it’s important to cap them securely. This is a crucial step to ensure that all the refrigerant is removed from the refrigerator. Use caps specifically designed for the type of refrigerant you are removing, and make sure to secure the caps tightly. Make sure to double check that all connections are secure before continuing to the next step.
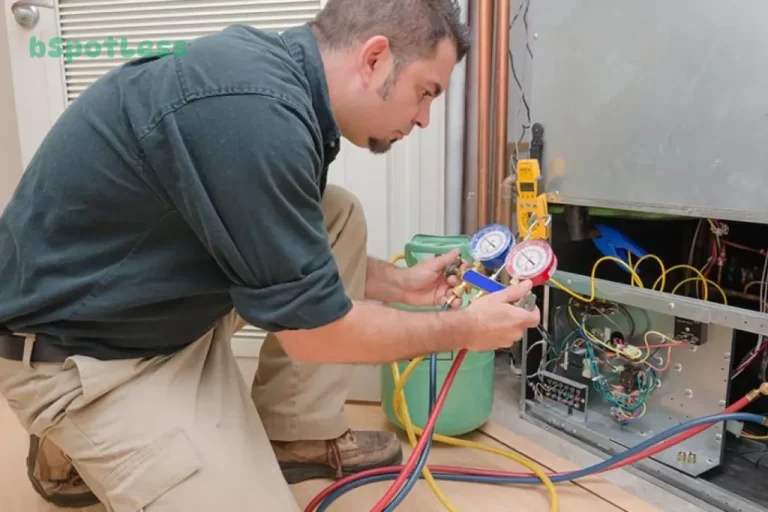
Attach a Refrigerant Recovery Machine to Refrigerator
Before attaching a refrigerant recovery machine to the refrigerator, it is important to check the disposal regulations for refrigerant from refrigeration and air-conditioning equipment and systems. Once you have familiarized yourself with the regulations and have all of the necessary safety equipment, you can begin attaching the machine to the refrigerator. Make sure that all of the seals are secure and that there are no leaks. The machine should be securely attached to the refrigerator so that it won’t become disconnected during the refrigerant recovery process.
Start the Refrigerant Recovery Process
Once you have connected the refrigerant recovery machine to the refrigerator, you are ready to start the refrigerant removal process. Make sure all safety precautions are followed, and that the recovery machine is operating properly. Start the machine and allow it to run until all of the refrigerant from the system has been recovered. Once the recovery process is complete, turn off the machine and disconnect it from the refrigerator.
Replace and Secure Refrigerator Parts
Once the refrigerant has been removed from the refrigerator, it is time to replace and secure all refrigerator parts. First, replace the doors and shelves that were removed. Secure them with the necessary screws and bolts. If any of the doors or shelves have handles, make sure to attach them as well. Next, reconnect the water supply line to the refrigerator and ensure that it is secure. Then, reconnect the power supply to the refrigerator and turn it back on. Finally, check to make sure that all seals are properly secured and that all parts are secure.