Are you looking to spruce up your home and add a classic touch to your living space? Removing the carpet from your hardwood floors can be a great way to do just that. But it’s no easy task – it takes some serious effort and determination. In this blog post, we’ll cover all the steps necessary for removing carpet from hardwood floors!
Prepare the Room
Before you start the process of removing carpet from hardwood floors, it’s important to prepare the room. Start by taking off any shoe molding and moving all furniture out of the room to provide enough space for cleaning. You’ll also want to protect yourself by wearing knee pads, work gloves, and safety glasses. Finally, make sure to spray the rubber parts on the floor with a lubricant to make the job easier. Now that you’ve taken the necessary steps to prepare the room, you’re ready to start removing the carpet.
Identify the Carpet Type
Once you have removed the shoe molding and furniture, it’s time to identify the type of carpet you have before proceeding. Is it glued down, or is it loose-laid? If it is glued down, you will need to use a pry bar to remove it. If it is loose-laid, you will need to cut through the carpet and padding with a utility knife. In either case, make sure you have the proper safety equipment in place such as work gloves, knee pads, and safety glasses. Once the carpet is removed, spray lubricant on the rubber parts of the hardwood floor to make cleaning easier.
Remove the Carpet and Padding
Removing the carpet and padding is the next step in the process. Before beginning, it’s important to take safety precautions such as wearing knee pads, work gloves, and safety glasses. Additionally, it helps to have a pry bar, utility knife, and lubricant on hand. Start by taking off the shoe molding if there is any, then identify the type of carpet. If it’s glued to the floor, use a pry bar to carefully remove it. For loose-laid carpets, use a utility knife to cut through the carpet and padding in strips. Move any furniture out of the way to give yourself enough room to work. Finally, spray lubricant on the rubber parts of the floor to make it easier to remove them.
Clean the Subfloor
Now that the carpet and padding have been removed, it is time to clean the subfloor. To remove any remaining stains or dirt, use a mop and warm, soapy water. Make sure to wring out the mop before applying it to the floor, to avoid flooding the room. Once you have finished mopping the floor, use a dry rag to wipe away any remaining moisture. After cleaning, you may want to lubricate any rubber parts on the floor to keep them from sticking. With the subfloor cleaned and prepped, you can move on to testing for asbestos and lead paint.
Test for Asbestos and Lead Paint
Before sanding the floor, it is important to test for asbestos and lead paint. Depending on the age of your home, the subfloor may contain potentially hazardous materials. Asbestos is a naturally occurring mineral fiber that was used in many building materials until the late 1970s. Lead paint was used in homes until 1978 and can be found in any home built before then. It is important to have a professional test for these materials and remove them if necessary. Once removed, you can move on to sanding the floor and applying the stain and finish.
Remove Adhesive and Glue Residue
Once the carpet and padding have been removed, it’s time to remove any remaining adhesive or glue residue from the hardwood floor. This can be a tedious process, so it’s important to be patient and use the right tools. Start by using a putty knife to scrape up any excess glue. For stubborn spots, use a heat gun to soften the glue and make it easier to remove. Once all the glue has been scraped up, use a damp cloth to wipe away any remaining residue. If necessary, you can also use a solvent-based cleaner or mineral spirits to remove any residual glue.
Sand the Floor for a Smooth Surface
Once the carpet and padding are removed, it is time to sand the floor for a smooth surface. Sanding is important for a successful hardwood floor refinishing job. Sanding will remove any old adhesive, glue residue and dirt on the floor. Make sure you use the right sandpaper grit and grade for your type of hardwood floor. After sanding, use a vacuum to thoroughly clean the floor before applying the stain and finish. It is also important to test for asbestos and lead paint before sanding. If asbestos or lead paint is present, you must hire a professional to remove it safely.
Fill in Gaps and Cracks
Once you’ve removed the carpet, padding, and adhesive residue, it’s time to fill in any gaps or cracks in the hardwood floor. This step is important for ensuring a smooth finish and preventing any splinters or other damages. You can use wood filler or sawdust to fill in any gaps or cracks in the wood. Be sure to use a putty knife to spread the filler evenly and ensure that all cracks or gaps are filled in. Once the filler has been applied, it’s important to sand it down to create a smooth surface before you begin staining and finishing the floor.
Choose the Right Stain and Finish
After you have removed the carpet and padding, and cleaned the subfloor, you can now begin to choose the right stain and finish for your hardwood floors. It is important to choose a stain and finish that will not only protect your floor from wear and tear, but also enhance its natural beauty. Stains come in a variety of colors, from classic browns and tans to modern grays and blues. Finishes protect the wood from scratches, moisture, and other elements while bringing out the natural grain of the wood. The most popular finishes are polyurethane, oil-based polyurethane, and water-based polyurethane. Each has its own advantages and disadvantages, so it is important to do your research before making a decision. Once you have chosen the right stain and finish, you can apply it to your hardwood floors with a brush or roller.
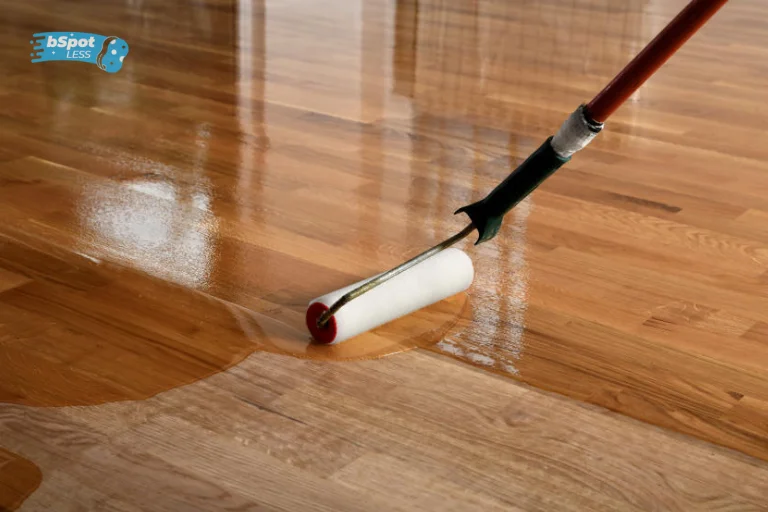
Apply the Stain and Finish
Now that you have removed the carpet and prepped the floor, it’s time to apply the stain and finish. To do this, you’ll need to choose a stain and finish that is suitable for your hardwood floor. Be sure to use a good quality stain and finish to ensure that your hardwood floors will look their best. Once you have chosen the right stain and finish, use a brush or roller to apply it to the floor. Make sure to work in small sections, and be sure to wait the appropriate amount of time between coats. Once all coats of stain and finish have been applied, allow the floors to dry thoroughly before moving furniture back in. With a little bit of effort, you can have a beautiful hardwood floor!