Are you looking for an easier way to replace the blades in your disposable razors? Have you ever wished that you could just remove and replace the blades instead of having to buy a whole new razor every time? If so, then this blog post is for you! We’ll show you how to safely and easily remove blades from disposable razors.
Safety Precautions
Before attempting to remove blades from disposable razors, it is important to take safety precautions. Make sure to wear protective gloves when handling blades and be aware of the sharp edges of the blade. Also, use tweezers or a needle-nose plier to remove the blade from the razor and be sure to keep fingers and hands away from the blades. Finally, be sure to work in a well-ventilated area and always have a first aid kit nearby in case of any accidents. With these safety precautions in mind, you can confidently remove blades from disposable razors and get back to shaving!
Choose the Right Tool
Once you have determined the type of disposable razor you need to remove the blades from, it is important to choose the right tool for the job. Depending on the type of disposable razor, you may need tweezers, needle-nose pliers, or a blade bank to remove the blades safely. For example, a TopCare Everyday Apex 5-Blade Disposable Razor requires tweezers or needle-nose pliers to remove the blade and a Dorco Fresh Twin Blade Disposable Razor requires a blade bank to safely remove the blades. For BIC Us. 5-Blade Disposable Razors, you will need tweezers or needle-nose pliers to remove the blade cap and a blade bank for removal of the blades. Lastly, for Daylogic Women’s 3-Blade and 5 Blade Disposable Shavers, you will need tweezers or needle-nose pliers to remove the blades and disconnector. It is important to use the right tool for each type of disposable razor in order to safely remove the blades.
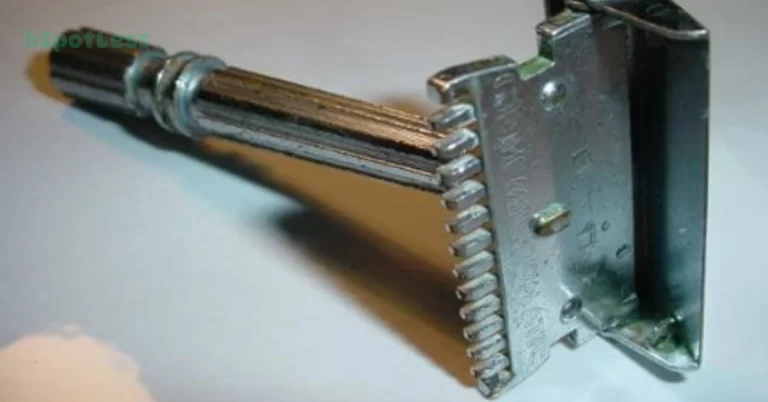
Remove the Blade Cap
Once you have the appropriate tool for the job, you can begin to remove the blade from the disposable razor. Start by removing the blade cap. This is typically a small plastic piece located at the end of the razor handle. You can use your needle-nose pliers to grip the cap and twist it off. Once the blade cap is removed, you will be able to see the blades inside the razor handle.
Pry Open the Handle
After removing the blade cap, the next step is to pry open the handle of the disposable razor. This can be done with a tweezer or needle-nose plier. Just place the tool at the base of the handle and twist it back and forth until the handle opens. Be careful not to damage the blades while prying open the handle. Once it is opened, you can move on to the next step in removing the blades.
Remove the Blade and Disconnector
After the handle has been opened, the blade and disconnector can now be removed. It is important to use caution when handling these pieces, as they are sharp. To remove the blade and disconnector, use a pair of tweezers or needle-nose pliers to gently pull them out. Be sure to keep the blades away from your skin to avoid cuts. Once the blade and disconnector have been removed, it is important to clean and disinfect them before storage.
Clean and Disinfect the Blades
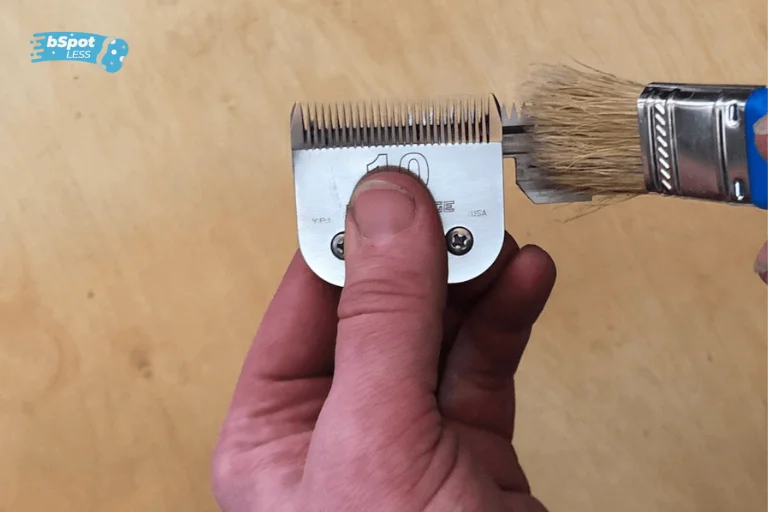
Once the blade and disconnector have been removed, it is important to clean and disinfect them. This will help prevent any bacteria or germs from transferring to the next person who uses the razor. To do this, first use a soft cloth to wipe away any debris or dirt that may be on the blades. Then, use an antibacterial solution or soap and water to thoroughly clean the blades. Finally, rinse the blades with warm water and let them dry before replacing them in the handle. Remember to keep your blades sharp and well-maintained for a close shave every time.
Use a Blade Bank for Storage
Once the blades have been removed and cleaned, it is important to store them properly. A blade bank is a great way to store blades, as it helps keep them organized and free of dust and dirt. This is especially important if you plan on using the blades again. A blade bank also allows you to see which blades have been used and which ones are still in good condition. This can help you save money over time, as you won’t have to purchase new blades as often.
Grease the Blades for Preservation
Once the blades have been removed from the disposable razors and cleaned and disinfected, it is important to take steps to ensure that they remain in good condition. Greasing the blades is a simple way to help preserve them for future use. Use a small brush or cloth to apply a thin layer of lubricating oil to each side of the blade. This will help reduce corrosion and make sure that the blades are still in good condition when you need them again.
Organize Your Blades for Easy Access
Organizing your blades for easy access is just as important as removing them from the disposable razors. By keeping the blades in a blade bank, you can easily locate the blade you need for your next shave. Additionally, storing your blades in a blade bank helps to keep them organized, which makes it easy to find the exact blade you need. To store your blades in a blade bank, simply insert the blades into the designated slots. This will help keep them organized and secure. Storing your blades in a blade bank also makes it easy to determine when it’s time to buy new blades.
Recycle or Dispose of Used Blades
Once you’ve removed the blade from the disposable razor and cleaned it, you should consider disposing of it properly. It’s important to do this in order to prevent injury and potential environmental damage. If you have a blade bank, you can safely store used blades until it’s time to recycle them. But if you don’t have one, you can use a container with a tight-fitting lid to store your blades until they can be recycled or disposed of. Taking the extra time to properly dispose of your blades will help ensure that they don’t end up in the wrong hands.