Are you having a hard time keeping your refrigerator cool? If so, then you may need to remove the Freon from the system. Removing Freon from a refrigerator can seem like an overwhelming task, but with the right tools and instructions, it doesn’t have to be. In this blog post, we’ll show you how to safely and effectively remove Freon from your refrigerator.
Identify the Type of Refrigerant Used
Knowing the type of refrigerant used in your refrigerator is an important step before attempting to remove it. It is essential to use the correct type of refrigerant as different types of refrigerants have different properties and not all types of refrigerants are compatible with each other. Depending on your refrigerator, the type of refrigerant used could be R-22 Freon, R-134a, or R-410A. You can easily determine the type of refrigerant by looking at the label on your refrigerator or checking the user manual.
Check for Leaks
Before you start the process of removing Freon from a refrigerator, it is important to check for leaks. This can be done by using an electronic leak detector or a vacuum pump. If there are any leaks, they will need to be repaired before any Freon can be safely removed. Once the leaks have been identified and repaired, the next step is to locate the refrigerant lines in order to disconnect them.
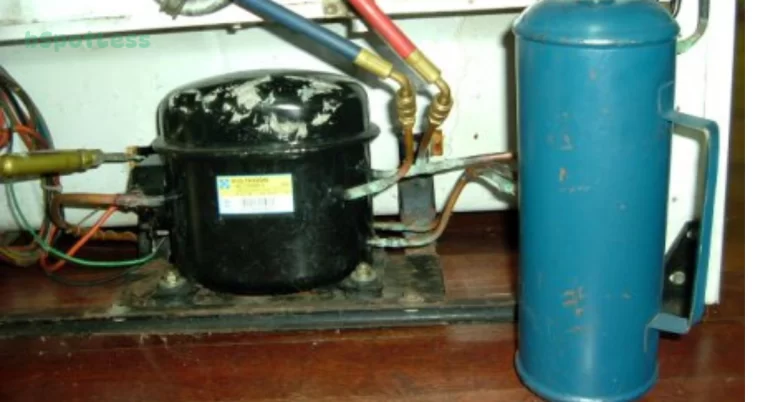
Locate the Refrigerant Lines
Once the type of refrigerant has been identified, the next step is to locate the refrigerant lines on the refrigerator. This is typically done by tracing the lines back from the compressor and evaporator coils to their source. It is important to note that the lines may go through multiple insulation layers and may also be concealed by other components, so it is important to take your time in this step and make sure you have a thorough understanding of the system. Once the lines are located, it is time to disconnect them from the refrigerator.
Disconnect the Refrigerant Lines
Once you have identified the type of refrigerant used in your fridge and checked for any leaks, the next step is to disconnect the refrigerant lines. This should be done with caution, as it is important to prevent any further leaks. Make sure to wear protective gloves and goggles when doing so. It is also important to ensure that you are properly disposing of the old refrigerant as per EPA regulations.
Recover the Refrigerant
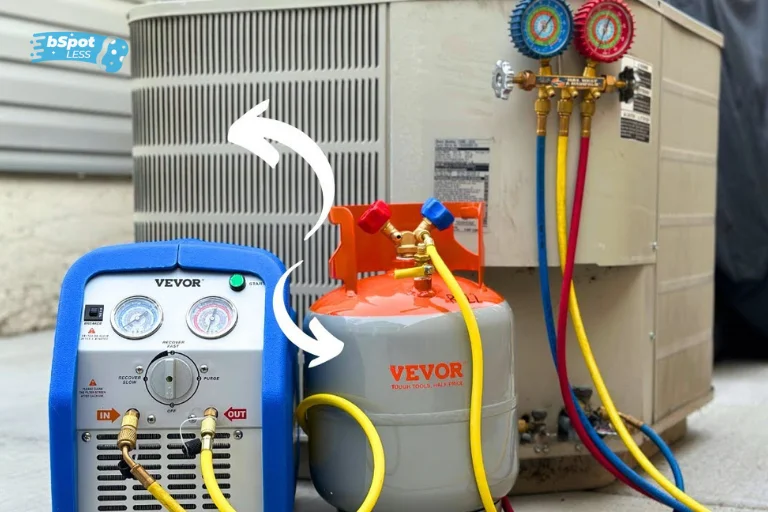
Once the refrigerant lines have been disconnected and safely stored away, it’s time to recover the refrigerant. This is a process where the refrigerant is vacuumed out of the system. A certified technician will use an EPA-approved recovery machine to ensure the Freon is extracted safely and without any leaks. Once all of the Freon has been recovered, the system can be inspected and any necessary repairs can be made.
Evacuate the System
After disconnecting the refrigerant lines, the next step is to evacuate the system. This means that all of the remaining refrigerant must be removed from the appliance. To do this, you will need an evacuation pump and a refrigerant recovery machine. Once you have set up the equipment, turn on the evacuation pump and let it run until all of the refrigerant has been removed from the system. Once completed, make sure to properly dispose of any used refrigerant in accordance with your local regulations.
Replace the Refrigerant Filter/Drier
After the refrigerant has been recovered, the filter/drier must be replaced. This is an important step as the filter/drier helps to keep the refrigerant clean and free of moisture, dirt, and debris. The new filter/drier should be installed in the same location as the old one. Once the filter/drier is in place, the lines should be reconnected and vacuum tested to ensure that there are no leaks.
Recharge the System with Fresh Refrigerant
Once the old refrigerant has been safely removed and the system has been evacuated, it is time to recharge the system with fresh refrigerant. It is important to note that the type of refrigerant used in your refrigerator must match the type of refrigerant that is being used in the system. The manufacturer’s manual should be consulted to determine what type of refrigerant should be used. Additionally, you must be sure to use the correct amount of refrigerant for your system. Too much or too little can cause problems. An accurately charged system will help ensure that your refrigerator will remain efficient and reliable for years to come.
Check For Leaks After Recharging
After recharging the system with fresh refrigerant, it is important to check for any potential leaks. This is done by using a leak detector, which is available at most home improvement stores. If any leaks are detected, the technician must repair them before the system can be put into operation. It is also important to monitor the system for any unusual noises or odors that might indicate a problem. If any of these signs are present, it is essential to contact an HVAC technician who has experience dealing with Freon removal and refrigerant systems.
Safely Dispose of Old Refrigerant
After recharging your refrigerator with new refrigerant, the last step is to safely dispose of the old refrigerant. It’s important to do this in accordance with local regulations. The most common method for disposing of old refrigerant is to take it to a certified technician who can properly recycle it. This would be the most eco-friendly option and will ensure that no harmful chemicals are being released into the environment. It’s also important to make sure that you have the proper equipment to safely store and transport the refrigerant, such as leak-proof containers and gloves. By properly disposing of your old refrigerant, you can help protect the environment and keep your refrigerator running smoothly for years to come.